
Posted on

Monitor No Signal on a Desktop PC? Check This First

Monitor no signal on a desktop PC – troubleshooting guide

Monitor no signal on a desktop PC? Check the graphics card first

Monitor no signal on a desktop PC is one of the most common problems we hear about, and in the overwhelming majority of cases nothing is broken: the monitor cable is simply plugged into the wrong port on the back of the computer. If your desktop has a dedicated graphics card, every monitor must connect to the card — not to the motherboard.

The wrong ports and the right ports
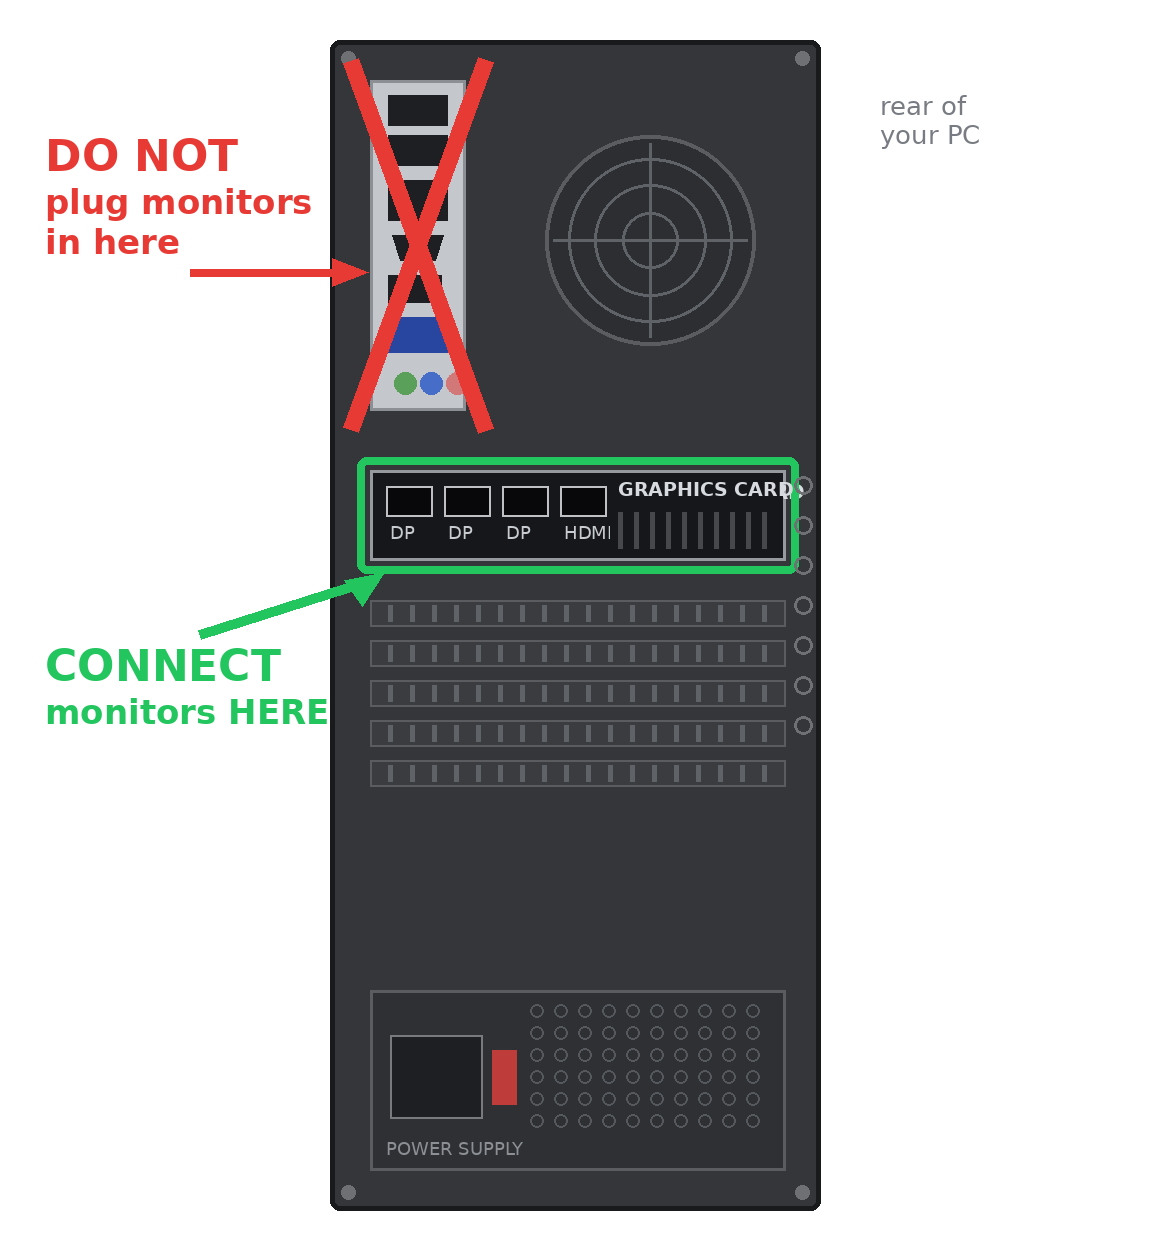
Look at the back of the case. The tall group of ports near the top belongs to the motherboard — on a computer with a dedicated graphics card these video outputs are usually inactive, so a monitor plugged in there shows a black screen or “no signal”. The graphics card sits lower down, running sideways across the case, with its DisplayPort and HDMI ports in a horizontal row. That’s where every monitor belongs — and yes, you can use several of the card’s ports at once for multiple monitors.

A 60-second checklist

1. Trace the monitor cable to the back of the PC — is it in the top (motherboard) ports? Move it down to the graphics card.
2. Check both ends of the cable are seated firmly, and that the monitor is set to the right input (HDMI 1, DisplayPort, etc.) using its own buttons.
3. Try a different port on the graphics card, or a different cable — cables fail more often than computers.
4. Restart the PC with the monitor connected, so the system detects it from the start.

Why this happens after moving house or cleaning

The monitor no signal surprise almost always follows a move, a clean-up behind the desk, or a helpful family member re-plugging cables. The motherboard ports sit higher and look inviting, so cables naturally end up there. One glance at the picture above and the fix takes ten seconds.

Tested before it ships

Every ArkPC desktop with a dedicated graphics card leaves our bench with the monitor outputs tested and clearly identified — and our machines arrive with Linux installed, configured and ready to work. Browse refurbished Linux desktops and new Linux workstations, or contact ArkPC support if your screen is still dark — we’re Australian-based and happy to help.

Posted on

Solved: Live Linux USB freeze the laptop on boot

Problem Live Linux USB freeze:

Are you encountering a frustrating issue where your Live Linux USB freeze during the boot process when attempting to use a Live Linux USB? This often occurs due to graphics driver conflicts, particularly with Intel integrated graphics. Don’t worry, this guide provides a step-by-step solution.

Introduction:
Booting a Live Linux USB is a common way to test or install a Linux distribution. However, some users experience a complete system freeze during the boot process, hindering their progress. This issue is frequently related to Power Saving Register (PSR) functionality within Intel’s i915 graphics driver, which can cause conflicts on certain hardware configurations. This tutorial will guide you through a proven method to bypass this Live Linux USB freeze and successfully boot and install your desired Linux distribution.

Step-by-Step Solution:

Boot in Safe Graphics Mode:
Insert your Live Linux USB into your laptop.
Power on the laptop and access the boot menu (usually by pressing F12, ESC, or another key during startup).
Select your Live Linux USB.
Choose the “Safe Graphics Mode” or “Compatibility Mode” option from the GRUB menu. This mode loads basic graphics drivers, often bypassing the problematic PSR functionality.
Your laptop should now boot into the Live Linux environment without freezing. Proceed with your Linux installation.

Initial Boot Configuration (Temporary Fix):
After installation, remove the USB and restart your laptop.
As the laptop boots, press the ESC key repeatedly to access the GRUB menu.
Select the Linux boot entry and press “e” to edit the boot parameters.
Locate the line containing “quiet splash.”
Add i915.enable_psr=0 to the end of this line. The line should now resemble: quiet splash i915.enable_psr=0
Press CTRL + X to save the changes and continue booting. This temporarily disables PSR for this boot session.

Permanent GRUB Configuration:
Once logged into your installed Linux system, open a terminal.
Edit the GRUB configuration file: sudo nano /etc/default/grub
Find the line containing GRUB_CMDLINE_LINUX_DEFAULT=”quiet splash”.
Add i915.enable_psr=0 within the quotes, so the line looks like: GRUB_CMDLINE_LINUX_DEFAULT=”quiet splash i915.enable_psr=0″
Save the file (CTRL + X, then Y, then Enter).
Update GRUB to apply the changes: sudo update-grub
Restart the computer.

Verification:
After the reboot your computer should boot normally.
You can verify that the change has been applied by running the command cat /proc/cmdline in the terminal. The output should include i915.enable_psr=0.

Explanation:
i915.enable_psr=0 disables the Power Saving Register (PSR) feature of Intel integrated graphics. PSR, while intended to save power, can cause conflicts with some hardware, leading to system freezes.

Conclusion:
By following these steps, you can effectively resolve the “Live Linux USB freeze” issue and successfully install your chosen Linux distribution. Remember that this solution primarily addresses conflicts related to Intel i915 graphics. If you encounter persistent issues, consider researching hardware-specific compatibility or consulting your Linux distribution’s support resources.


Or skip all of this entirely

This guide exists because doing it yourself is fiddly. Every ArkPC Linux desktop and laptop arrives with the distro of your choice pre-installed, configured and tested in Australia on hardware we verify works with Debian-based and the other Linux systems we sell – no USB sticks, no boot menus, no driver hunting. Turn it on and it just works, backed by local support and a 1-year warranty.

Browse Linux laptops | Linux desktops | brand-new Linux laptops

Posted on

Solved – How to boot from Bootable USB

How to boot from Bootable USB?

Insert the USB boot media into USB slot (Preferable One of the Back USB ports).
Power On your PC and press repeatedly F12 until boot manager appears on the screen.

ArkPC hardware is based on Gigabyte motherboards and boot manager option key is F12.

Booting from a bootable USB depends on motherboard manufacturer. Some manufacturers have different Key combinations for Boot Manager Option, you can try: TAB, ESC, F10, F12


Or skip all of this entirely

This guide exists because doing it yourself is fiddly. Every ArkPC Linux desktop and laptop arrives with the distro of your choice pre-installed, configured and tested in Australia on hardware we verify works with Debian-based and the other Linux systems we sell – no USB sticks, no boot menus, no driver hunting. Turn it on and it just works, backed by local support and a 1-year warranty.

Browse Linux laptops | Linux desktops | brand-new Linux laptops

Posted on

Solved – How to burn ISO to USB

How to burn ISO to USB?

Download Rufus from the following link :
https://rufus.ie/

What do you need:

1 You need an 8GB USB drive or larger. (USB Drive)
2 Rufus Application (ISO to USB )
3 ISO file you require to create the Bootable USB

Create bootable USB drive from ISO

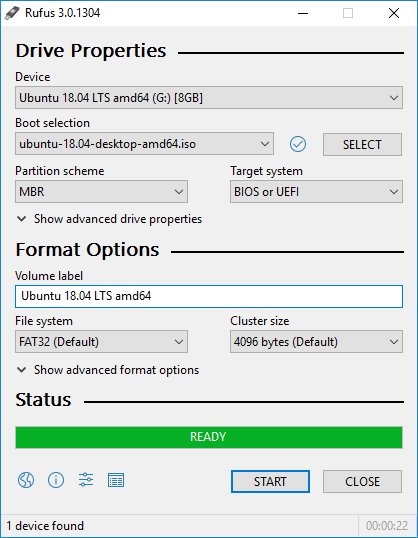
1 Open Rufus application.
2 Select as Device your USB drive.
3 Select ISO file you want to create bootable USB from.
4 Leave the rest of the Settings as Default,
5 Click Start and wait until Copy process ends.
6 Click Close, Now you have a bootable USB drive

rufus iso to usb

Or skip all of this entirely

This guide exists because doing it yourself is fiddly. Every ArkPC Linux desktop and laptop arrives with the distro of your choice pre-installed, configured and tested in Australia on hardware we verify works with Debian-based and the other Linux systems we sell – no USB sticks, no boot menus, no driver hunting. Turn it on and it just works, backed by local support and a 1-year warranty.

Browse Linux laptops | Linux desktops | brand-new Linux laptops