Posted on

Monitor No Signal on a Desktop PC? Check This First

Monitor no signal on a desktop PC – troubleshooting guide

Monitor no signal on a desktop PC? Check the graphics card first

Monitor no signal on a desktop PC is one of the most common problems we hear about, and in the overwhelming majority of cases nothing is broken: the monitor cable is simply plugged into the wrong port on the back of the computer. If your desktop has a dedicated graphics card, every monitor must connect to the card — not to the motherboard.

The wrong ports and the right ports
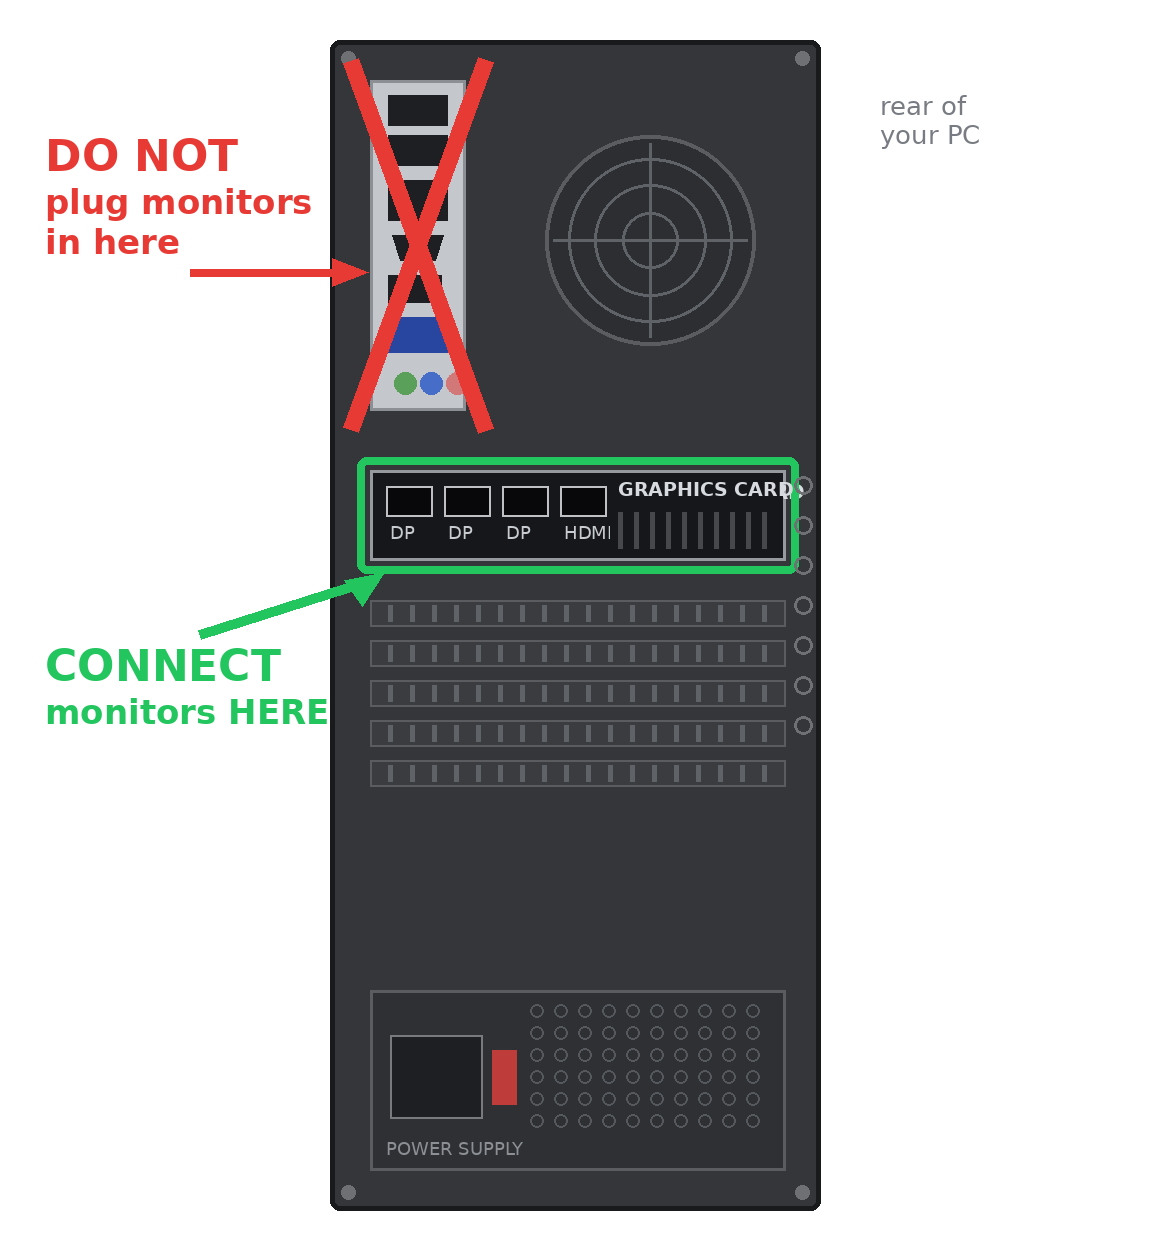
Look at the back of the case. The tall group of ports near the top belongs to the motherboard — on a computer with a dedicated graphics card these video outputs are usually inactive, so a monitor plugged in there shows a black screen or “no signal”. The graphics card sits lower down, running sideways across the case, with its DisplayPort and HDMI ports in a horizontal row. That’s where every monitor belongs — and yes, you can use several of the card’s ports at once for multiple monitors.

A 60-second checklist

1. Trace the monitor cable to the back of the PC — is it in the top (motherboard) ports? Move it down to the graphics card.
2. Check both ends of the cable are seated firmly, and that the monitor is set to the right input (HDMI 1, DisplayPort, etc.) using its own buttons.
3. Try a different port on the graphics card, or a different cable — cables fail more often than computers.
4. Restart the PC with the monitor connected, so the system detects it from the start.

Why this happens after moving house or cleaning

The monitor no signal surprise almost always follows a move, a clean-up behind the desk, or a helpful family member re-plugging cables. The motherboard ports sit higher and look inviting, so cables naturally end up there. One glance at the picture above and the fix takes ten seconds.

Tested before it ships

Every ArkPC desktop with a dedicated graphics card leaves our bench with the monitor outputs tested and clearly identified — and our machines arrive with Linux installed, configured and ready to work. Browse refurbished Linux desktops and new Linux workstations, or contact ArkPC support if your screen is still dark — we’re Australian-based and happy to help.
Posted on

Dual Boot Menu Not Showing – How to Get It Back

Dual boot menu not showing – guide to restoring the boot menu on a Linux PC

Dual boot menu not showing? Here’s how it works and how to get it back

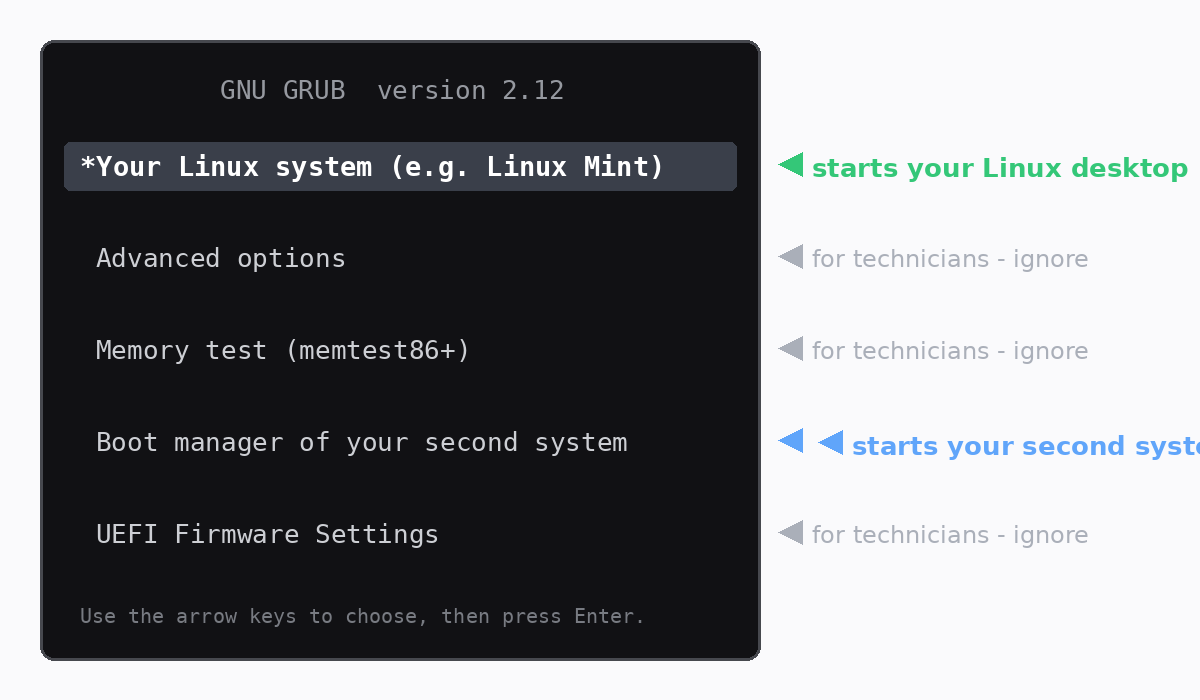
The dual boot menu is the black text screen that appears every time you switch on a computer with two operating systems, letting you choose which one to start. It looks plain, but that’s its strength — it lives outside both systems, so it is extremely reliable. This guide shows you how to read it, and how to bring the dual boot menu back if your computer suddenly starts skipping it.

Reading the menu

Use the ↑ and ↓ arrow keys to highlight an entry, then press Enter. The first entry is your Linux system and starts automatically after about 10 seconds if you don’t touch anything. The entry mentioning a boot manager starts your second operating system. Everything else — advanced options, memory test, firmware settings — is for technicians and can be safely ignored. Your choice only lasts for that session; next power-on, the dual boot menu asks again.

When the menu disappears

Very occasionally, a major update of your second operating system puts its own boot manager first in the computer’s firmware, so the machine boots straight into it and the dual boot menu never appears. Nothing has been deleted — your Linux system and all your files are still exactly where they were. The firmware is simply pointing at the wrong door.

Getting the dual boot menu back

Step 1. Restart the computer and immediately tap your machine’s boot-menu key — commonly F12, F9, F10 or Esc — about once per second until a list of boot devices appears.

Step 2. Choose the entry named “ubuntu” or the one carrying your Linux distro’s name. The dual boot menu returns immediately, and in most cases stays back for good.

Step 3. If it keeps happening, open the BIOS/UEFI settings (often the Del or F2 key at power-on) and move the Linux entry to the top of the boot order list. That makes the menu permanent again.

Dual boot without the guesswork

Every dual-boot computer we build ships with the boot menu configured, tested through restarts and updates, and a printed quick-guide in the box — because choosing your system should be the easiest part of your day. Browse our Linux desktops and laptops with the Dual Boot option at checkout, or ask ArkPC support if your menu is misbehaving — we answer real questions and often turn them into new guides.

Posted on

Function Keys & Screen Brightness on Linux Laptops

Screen brightness on Linux laptops - brightness icon and function keys

Screen brightness on Linux laptops – and those function keys

If screen brightness on Linux won’t adjust, or your function keys for volume and brightness do nothing, it’s almost always a small configuration gap rather than broken hardware. This guide covers the brightness keys, the wider Fn row, and the reliable fallbacks when a shortcut misbehaves.

Step 1 – Adjust brightness from settings first

Before touching the keyboard, confirm brightness works at all. Open Settings → Power or click the system tray and use the brightness slider. If the slider moves the brightness but your keys don’t, the issue is just key mapping — covered below. If even the slider does nothing, read on to Step 3.

Step 2 – The function key lock

Many laptops have an Fn Lock (often Fn+Esc, or a padlock symbol on a key). When it’s set the “wrong” way, the media and brightness keys need Fn held down, or stop working as expected. Toggling Fn Lock is the single most common fix for function keys on Linux laptops — try it first.

Step 3 – When brightness keys do nothing

On some graphics hardware the brightness keys need a kernel hint to work. This is a known quirk with certain laptops, and it’s exactly the kind of thing that should be configured before a machine ships. Adjusting a boot parameter resolves it, but it’s worth having someone who knows the specific fix apply it rather than experimenting.

Step 4 – Volume, media and other Fn keys

Volume and media keys usually work out of the box. If a particular key doesn’t, you can map it manually in Settings → Keyboard → Keyboard Shortcuts, assigning the action you want to that key. This is a handy way to get a stubborn key doing something useful.

Step 5 – Keyboard backlight

If your laptop has a backlit keyboard, its key (often Fn plus a backlight symbol) cycles through brightness levels. Some models also expose it in the power settings. If it isn’t responding, it’s typically the same key-mapping situation as the screen brightness keys.

Sorted before it reaches you

Brightness and function-key quirks are exactly what we iron out on the bench. Every ArkPC Linux laptop is tested so screen brightness and the function keys work on your chosen distro before it ships across Australia. Fighting these on your own machine? Our support team knows the model-specific fixes.

Posted on

How to Change Your Password on Linux – Safely

Change your password on Linux - padlock icon, do it safely

How to change your password on Linux – safely

Knowing how to change your password on Linux is one of the first things to do with a new machine, and it takes under a minute. This guide shows the simple way to change it, plus one vital warning about Linux passwords that every owner should understand before they start.

The easy way – through Settings

Open Settings → Users, select your account, and click Password. Enter your current password once, then your new password twice, and confirm. That’s it — the change takes effect immediately, and you’ll use the new password the next time you log in or unlock the screen.

The terminal way

You can also change your password on Linux from a terminal with a single command:

passwd

It asks for your current password, then the new one twice. Nothing appears as you type — that’s normal, Linux hides password characters for security. Press Enter after each.

Choose a strong but memorable password

Aim for something long rather than complicated — a passphrase of a few unrelated words is both stronger and easier to remember than a short string of symbols. Avoid reusing a password from another account, and if you juggle many logins, a password manager is well worth setting up.

The one warning that really matters

On Linux, your password genuinely protects your data — which means if you forget it, it cannot simply be reset or recovered. There is no back door. Unlike some systems, a lost Linux password generally means the machine has to be wiped and set up again to regain access, losing anything not backed up. Write your new password down and keep it somewhere safe, or store it in a password manager.

Back up before you rely on memory

Because a forgotten password can mean a full reinstall, keep a current backup of your files (see our guide to backing up your home folder). That way your documents and photos are safe no matter what.

Set up right, supported locally

Every ArkPC Linux laptop and desktop arrives ready to use on your chosen distro, and we’ll explain password care when it reaches you here in Australia. Locked out or unsure about your setup? Our support team can advise on your options before anything drastic.

Posted on

No Internet on Linux – Step-by-Step Network Debugging

No internet on Linux - globe with a slash representing a broken network connection

No internet on Linux – step-by-step network debugging

No internet on Linux is frustrating, but it’s almost always fixable in a few minutes once you know where to look. This guide works through the problem in order — from “is it just this website?” down to the network card itself — so you can find the cause without guessing. It applies to Ubuntu, Mint, Debian and most other distros.

Step 1 – Find out how far the connection gets

Open a terminal and test three things in turn:

ping -c3 192.168.1.1
ping -c3 1.1.1.1
ping -c3 google.com

If the first (your router) fails, the problem is local — cable, WiFi or adapter. If the router replies but the second (a public IP) fails, the issue is between you and your provider. If only the third (a name) fails, your connection works and the problem is DNS — jump to Step 4.

Step 2 – Check NetworkManager sees your connection

nmcli device status

Your adapter should read connected. If it says unavailable or disconnected, the network service may have stalled. Restart it with:

sudo systemctl restart NetworkManager

Wait ten seconds and check again — this alone clears a surprising number of “no internet on Linux” cases.

Step 3 – Wired vs wireless

If WiFi is the problem, plug in an Ethernet cable to confirm the rest of the system is fine. A working wired connection but dead WiFi points to a wireless driver issue — our separate WiFi troubleshooting guide covers that in detail. No wired option? Tethering a phone over USB is a quick way to get online temporarily so you can install any fix you need.

Step 4 – Fixing DNS

If you can reach IP addresses but not website names, DNS is failing. Test with a public resolver:

ping -c3 1.1.1.1
nslookup google.com 1.1.1.1

If that works, set your connection to use a reliable public DNS server in Settings → Network → your connection → IPv4, then turn off automatic DNS and enter the server manually. Reconnect and names should resolve again.

Step 5 – Rule out the router

Before assuming it’s the computer, check whether other devices are online. If nothing in the house has internet, restart the router and contact your provider. If only the Linux machine is affected, the cause is local — and the steps above will have narrowed it down.

Hardware that connects out of the box

Network adapters with poor Linux support are a common root cause of these headaches. Every ArkPC Linux laptop and desktop is tested with wired and wireless networking working on your chosen distro before it ships anywhere in Australia. If your current machine keeps dropping offline, talk to our support team — we’ll tell you honestly whether it’s a setting, a driver, or hardware worth replacing.

Posted on

How to Install Software on Linux – Ubuntu & Mint Guide

How to install software on Linux using the Ubuntu and Mint app store, apt and Flatpak

How to install software on Linux – Ubuntu and Mint made easy

Learning how to install software on Linux takes about five minutes, and most of the time you won’t touch a command line at all. Ubuntu and Mint give you several ways to add apps, from a friendly app store to a single typed command. Here’s each method, when to use it, and how they fit together.

The easiest way – the Software centre

The simplest way to install software on Linux is the built-in app store: App Center on Ubuntu, Software Manager on Mint. Open it, search for what you want — a browser, a photo editor, a game — and click Install. It works just like an app store on a phone, with categories, ratings and one-click updates. For most people, this covers everything they’ll ever need.

The fast way – apt in the terminal

If you know the name of the package, the terminal is quicker. The apt tool installs from your distribution’s official, security-checked repositories:

sudo apt update
sudo apt install vlc

Replace vlc with whatever you need. The update line refreshes the list of available packages first; the install line does the work. This is the method you’ll see in most online guides.

The widest selection – Flatpak and Flathub

Some apps — especially the very latest versions — are distributed as Flatpaks from a store called Flathub. Linux Mint includes Flatpak support out of the box, so these appear right alongside everything else in Software Manager. Flatpaks are self-contained, which means an app gets the exact libraries it expects regardless of your distro — handy for newer or less common software.

Installing a downloaded .deb file

Occasionally a vendor offers a direct download as a .deb package. Double-click the downloaded file and your software centre will offer to install it. Only do this with software from a source you trust, since .deb files install with full system access — the app store and apt are safer because their contents are vetted.

Keeping everything updated

However you install an app, updates arrive through the same update manager, so your whole system and all its software stay current from one place. Run updates regularly — it’s the single best habit for a healthy, secure Linux machine.

Set up and ready to go

Every ArkPC Linux laptop and desktop arrives with the software centre configured and common applications already installed and tested on your chosen distro, so you can start adding what you need from day one. Stuck on a particular program? Our Australian support team is happy to help you get it running.

Posted on

Which Linux Distro Should I Choose? A Beginner’s Guide

Which Linux distro should I choose - branching paths to Ubuntu, Mint, Debian, Zorin, Pop!_OS, Fedora

Which Linux distro should I choose? A simple guide

“Which Linux distro should I choose?” is the first question most people ask, and the good news is you don’t need to know the technical differences to pick well. The right distribution mostly comes down to what your machine is for and how familiar you want it to feel. Here’s a plain-English guide to the distros we install and test.

Coming from another operating system? Start with Zorin OS or Linux Mint

If you want a desktop that feels instantly familiar — a taskbar, a start-style menu, everything where you’d expect — Zorin OS and Linux Mint are the easiest landing spots. They’re polished, stable, and designed so that everyday tasks need no terminal at all. This is the answer to “which Linux distro should I choose?” for most first-time switchers.

Want the mainstream standard? Choose Ubuntu

Ubuntu is the most widely used desktop Linux, which means almost every guide, forum answer and piece of software targets it first. If you value having the largest community and the broadest software support, Ubuntu is a safe, well-trodden choice that stays current with long-term support releases.

Reviving older hardware? Linux Mint or a lightweight desktop

On machines with modest memory, a lighter desktop keeps things responsive. Linux Mint (especially its Xfce edition) and similar lightweight options run smoothly where heavier systems would struggle, giving an older laptop a genuine second life.

Developing or tinkering? Debian, Fedora or Pop!_OS

Debian is rock-solid and the foundation many other distros are built on — ideal if you prize stability. Fedora ships newer technology sooner, which developers often prefer. Pop!_OS is tuned for productivity and works particularly well on machines with discrete graphics. Any of these is a strong pick if you’re comfortable getting under the hood.

Still unsure? That’s normal

You don’t have to get this perfect. The desktops differ far less than the marketing suggests, and most software runs on all of them. If you’re torn between two, pick the one that looks most comfortable — you can always tell us your use case and we’ll recommend the best fit.

Choose the distro, we’ll handle the rest

When you order a Linux laptop or desktop from ArkPC, you simply select your distro at checkout and we pre-install, configure and test it on the actual hardware here in Australia — no downloading, no setup, no guesswork. Tell us how you’ll use the machine and we’ll help you choose the distro that fits.

Posted on

Microsoft Office Alternative on Linux – LibreOffice & OnlyOffice

Microsoft Office alternative on Linux shown with LibreOffice and OnlyOffice document

Microsoft Office alternative on Linux – LibreOffice and OnlyOffice

Looking for a Microsoft Office alternative on Linux? You have two excellent free options — LibreOffice and OnlyOffice — and both open, edit and save the Word, Excel and PowerPoint files you already have. This guide explains which one to use, how to keep your documents compatible, and how to get started in minutes.

LibreOffice – the all-round default

LibreOffice is the most popular Microsoft Office alternative on Linux and comes pre-installed on most distributions. It’s a full suite: Writer (documents), Calc (spreadsheets), Impress (presentations), plus Draw and Base. It opens .docx, .xlsx and .pptx files directly, and you can keep saving in those formats so colleagues on other systems can still open your work — just choose Keep Current Format when prompted.

OnlyOffice – best for Microsoft file fidelity

If you exchange complex documents with people using Microsoft Office every day, OnlyOffice is worth installing. Its interface mirrors the modern ribbon layout, and it tends to reproduce tricky .docx and .xlsx formatting — tables, tracked changes, advanced cell formulas — more faithfully than any other free option. Many people run LibreOffice for everyday work and keep OnlyOffice on hand for documents that must look pixel-perfect.

Opening and saving Office files

Both suites handle Microsoft formats natively. To make sure a document always saves as .docx (rather than the open .odt format), set the default in Tools → Options → Load/Save → General in LibreOffice. Spreadsheets and presentations have the same setting. If a layout looks slightly different, it’s almost always a missing font.

The font tip that fixes most layout differences

Microsoft’s Calibri and Cambria fonts aren’t included with Linux for licensing reasons, so a document built around them can reflow. Installing the free, metric-compatible Carlito and Caladea fonts (drop-in replacements that take the same space on the page) resolves the vast majority of these differences. On Ubuntu and Mint they’re usually one click away in the software centre.

What about online editing?

You can also edit Microsoft documents in a web browser using free cloud office suites, which is handy for quick edits or sharing. For serious offline work, though, a desktop suite is faster and keeps your files private on your own machine — which is the whole point of running Linux.

Office that’s ready on day one

Every ArkPC Linux laptop and desktop ships with a working office suite already set up on your chosen distro, tested in Australia before it leaves our bench — so you can open your existing documents the moment you switch it on. Not sure which suite fits how you work? Ask our local support team and we’ll point you to the right one.

Posted on

No Sound on Linux – Fix Audio on Ubuntu and Mint

No sound on Linux - muted speaker icon, fix audio on Ubuntu and Mint

No sound on Linux – fix audio on Ubuntu and Mint

No sound on Linux after a fresh install is almost always a settings or driver issue rather than broken hardware, and it’s usually fixed in minutes. Work through these steps in order — they go from the most common cause to the rarest.

Step 1 – Check the obvious first

Click the speaker icon in the system tray: is the output muted, or is the volume at zero? Then open Settings → Sound and look at the Output Device dropdown. The most frequent cause of no sound on Linux is the wrong output being selected — for example HDMI audio while your speakers are on the headphone jack, or vice versa. Try each device in the list while playing music.

Step 2 – Test with a different application

Play a video in Firefox and a local file in your music player. If one works and the other doesn’t, the problem is that application’s own volume — open the sound settings’ Applications tab and check per-app levels.

Step 3 – Restart the audio system

Modern Ubuntu and Mint use PipeWire; older releases use PulseAudio. Restart whichever is present:

systemctl --user restart pipewire pipewire-pulse
pulseaudio -k

Log out and back in if sound doesn’t return immediately.

Step 4 – Check the hardware level with ALSA

alsamixer

Use the arrow keys and check that Master, PCM and Speaker channels aren’t muted (an MM label means muted — press M to unmute). Laptops sometimes ship with Auto-Mute Mode enabled, which silences speakers permanently; set it to Disabled here.

Step 5 – Still silent?

Run aplay -l to confirm Linux sees your sound card at all. If no card is listed, the codec may need a newer kernel — updating the system often resolves this on recent hardware.

HDMI, USB and Bluetooth audio quirks

External audio has its own pitfalls. HDMI sound only flows while the monitor or TV is the selected output device, and some displays must be on before the PC boots to be detected. USB headsets register as a separate sound card – select them explicitly in Settings, then check their volume independently. Bluetooth headphones that connect but stay silent are usually in the wrong profile: switch from the low-quality HSP/HFP profile to A2DP in the sound settings.

Sound that just works

Audio quirks are exactly the kind of thing we iron out before a machine leaves our bench. Every ArkPC Linux desktop and laptop is tested with working sound on your chosen distro before shipping anywhere in Australia. Stuck on your own hardware? ArkPC support is local and happy to help.

Posted on

Linux WiFi Not Working – Fixes for Laptop and Desktop

Linux WiFi not working – troubleshooting guide for Linux laptops and desktops

Linux WiFi not working – how to diagnose and fix it

Linux WiFi not working is the single most common issue people hit after installing Linux on a laptop, and in most cases it comes down to one thing: the wireless chip needs a driver (firmware) that didn’t load out of the box. This guide takes you from diagnosis to fix, step by step, on Ubuntu, Mint, Debian and most other distros.

Step 1 – Confirm the hardware is detected

Open a terminal and run:

lspci | grep -i network
lsusb | grep -i wireless

If a wireless adapter is listed, the hardware is visible and the problem is software. If nothing appears at all, check that WiFi isn’t disabled by a hardware switch or function key (often Fn+F2 or similar on laptops).

Step 2 – Check whether a driver is loaded

nmcli device
sudo lshw -C network

A device shown as unavailable or a line reading network UNCLAIMED means no driver is attached — the classic cause of Linux WiFi not working.

Step 3 – Install the missing driver

On Ubuntu and Mint, open Software & Updates → Additional Drivers; proprietary wireless drivers (Broadcom is the usual suspect) are offered there with one click. Plug in Ethernet or tether your phone over USB first, since downloading the driver needs a temporary connection. On Debian, enable the non-free-firmware repository and install the package for your chip.

Step 4 – When WiFi connects but keeps dropping

Intermittent drops are usually power management being too aggressive. Test with:

sudo iwconfig wlan0 power off

If the connection becomes stable, make the change permanent in a NetworkManager configuration file — or ask us and we’ll walk you through it.

Step 5 – Check rfkill and airplane mode

Linux keeps a software kill-switch for radios. Run:

rfkill list

If your wireless adapter shows Soft blocked: yes, run rfkill unblock wifi and reconnect. Hard blocked means a physical switch or BIOS setting is turning the radio off – check both. Airplane mode toggled by a stray function key press is a surprisingly common cause of WiFi vanishing overnight.

The honest fix: hardware that’s known to work

Some wireless chips simply have poor Linux support, and no amount of configuration makes them reliable. Every ArkPC Linux laptop is tested in Australia with WiFi working out of the box on your chosen distro, and our desktops offer a tested WiFi card option at checkout. If your current machine’s WiFi is beyond saving, talk to our support team — sometimes a $20 USB adapter with a well-supported chip is all you need, and we’ll tell you honestly which one.