
Posted on

Dual Boot Menu Not Showing – How to Get It Back

Dual boot menu not showing – guide to restoring the boot menu on a Linux PC

Dual boot menu not showing? Here’s how it works and how to get it back

The dual boot menu is the black text screen that appears every time you switch on a computer with two operating systems, letting you choose which one to start. It looks plain, but that’s its strength — it lives outside both systems, so it is extremely reliable. This guide shows you how to read it, and how to bring the dual boot menu back if your computer suddenly starts skipping it.

Reading the menu
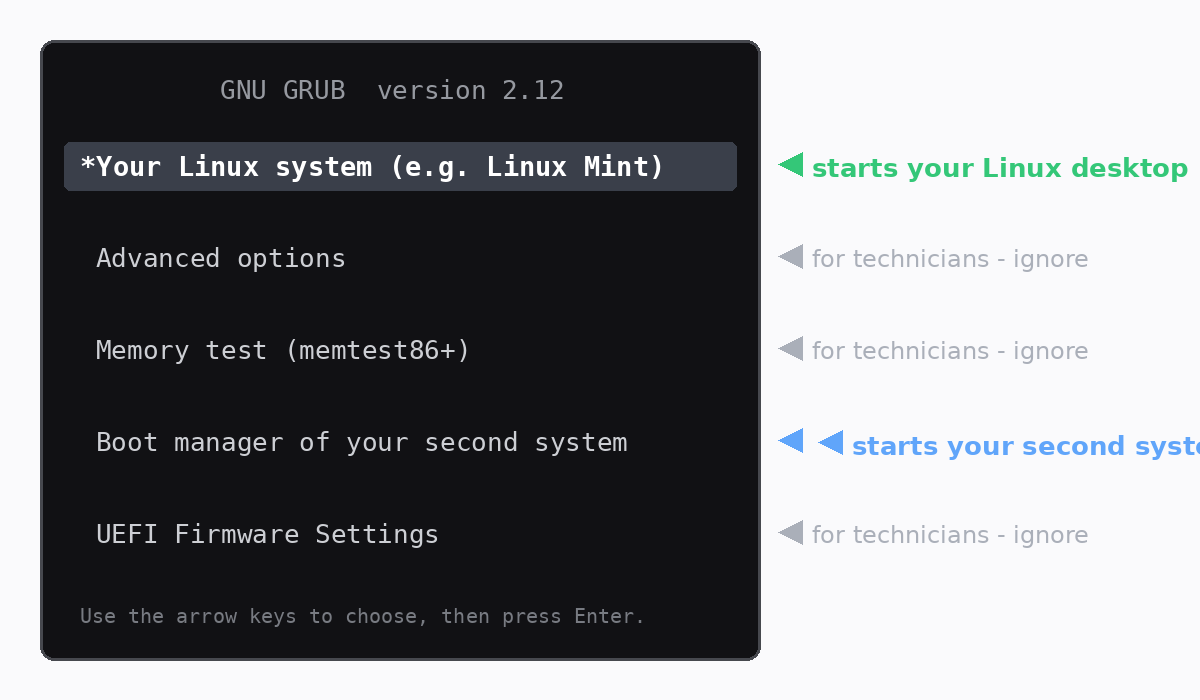
Use the ↑ and ↓ arrow keys to highlight an entry, then press Enter. The first entry is your Linux system and starts automatically after about 10 seconds if you don’t touch anything. The entry mentioning a boot manager starts your second operating system. Everything else — advanced options, memory test, firmware settings — is for technicians and can be safely ignored. Your choice only lasts for that session; next power-on, the dual boot menu asks again.

When the menu disappears

Very occasionally, a major update of your second operating system puts its own boot manager first in the computer’s firmware, so the machine boots straight into it and the dual boot menu never appears. Nothing has been deleted — your Linux system and all your files are still exactly where they were. The firmware is simply pointing at the wrong door.

Getting the dual boot menu back

Step 1. Restart the computer and immediately tap your machine’s boot-menu key — commonly F12, F9, F10 or Esc — about once per second until a list of boot devices appears.

Step 2. Choose the entry named “ubuntu” or the one carrying your Linux distro’s name. The dual boot menu returns immediately, and in most cases stays back for good.

Step 3. If it keeps happening, open the BIOS/UEFI settings (often the Del or F2 key at power-on) and move the Linux entry to the top of the boot order list. That makes the menu permanent again.

Dual boot without the guesswork

Every dual-boot computer we build ships with the boot menu configured, tested through restarts and updates, and a printed quick-guide in the box — because choosing your system should be the easiest part of your day. Browse our Linux desktops and laptops with the Dual Boot option at checkout, or ask ArkPC support if your menu is misbehaving — we answer real questions and often turn them into new guides.

Posted on

How to Install Software on Linux – Ubuntu & Mint Guide

How to install software on Linux using the Ubuntu and Mint app store, apt and Flatpak

How to install software on Linux – Ubuntu and Mint made easy

Learning how to install software on Linux takes about five minutes, and most of the time you won’t touch a command line at all. Ubuntu and Mint give you several ways to add apps, from a friendly app store to a single typed command. Here’s each method, when to use it, and how they fit together.

The easiest way – the Software centre

The simplest way to install software on Linux is the built-in app store: App Center on Ubuntu, Software Manager on Mint. Open it, search for what you want — a browser, a photo editor, a game — and click Install. It works just like an app store on a phone, with categories, ratings and one-click updates. For most people, this covers everything they’ll ever need.

The fast way – apt in the terminal

If you know the name of the package, the terminal is quicker. The apt tool installs from your distribution’s official, security-checked repositories:

sudo apt update
sudo apt install vlc

Replace vlc with whatever you need. The update line refreshes the list of available packages first; the install line does the work. This is the method you’ll see in most online guides.

The widest selection – Flatpak and Flathub

Some apps — especially the very latest versions — are distributed as Flatpaks from a store called Flathub. Linux Mint includes Flatpak support out of the box, so these appear right alongside everything else in Software Manager. Flatpaks are self-contained, which means an app gets the exact libraries it expects regardless of your distro — handy for newer or less common software.

Installing a downloaded .deb file

Occasionally a vendor offers a direct download as a .deb package. Double-click the downloaded file and your software centre will offer to install it. Only do this with software from a source you trust, since .deb files install with full system access — the app store and apt are safer because their contents are vetted.

Keeping everything updated

However you install an app, updates arrive through the same update manager, so your whole system and all its software stay current from one place. Run updates regularly — it’s the single best habit for a healthy, secure Linux machine.

Set up and ready to go

Every ArkPC Linux laptop and desktop arrives with the software centre configured and common applications already installed and tested on your chosen distro, so you can start adding what you need from day one. Stuck on a particular program? Our Australian support team is happy to help you get it running.