
Posted on

Monitor No Signal on a Desktop PC? Check This First

Monitor no signal on a desktop PC – troubleshooting guide

Monitor no signal on a desktop PC? Check the graphics card first

Monitor no signal on a desktop PC is one of the most common problems we hear about, and in the overwhelming majority of cases nothing is broken: the monitor cable is simply plugged into the wrong port on the back of the computer. If your desktop has a dedicated graphics card, every monitor must connect to the card — not to the motherboard.

The wrong ports and the right ports
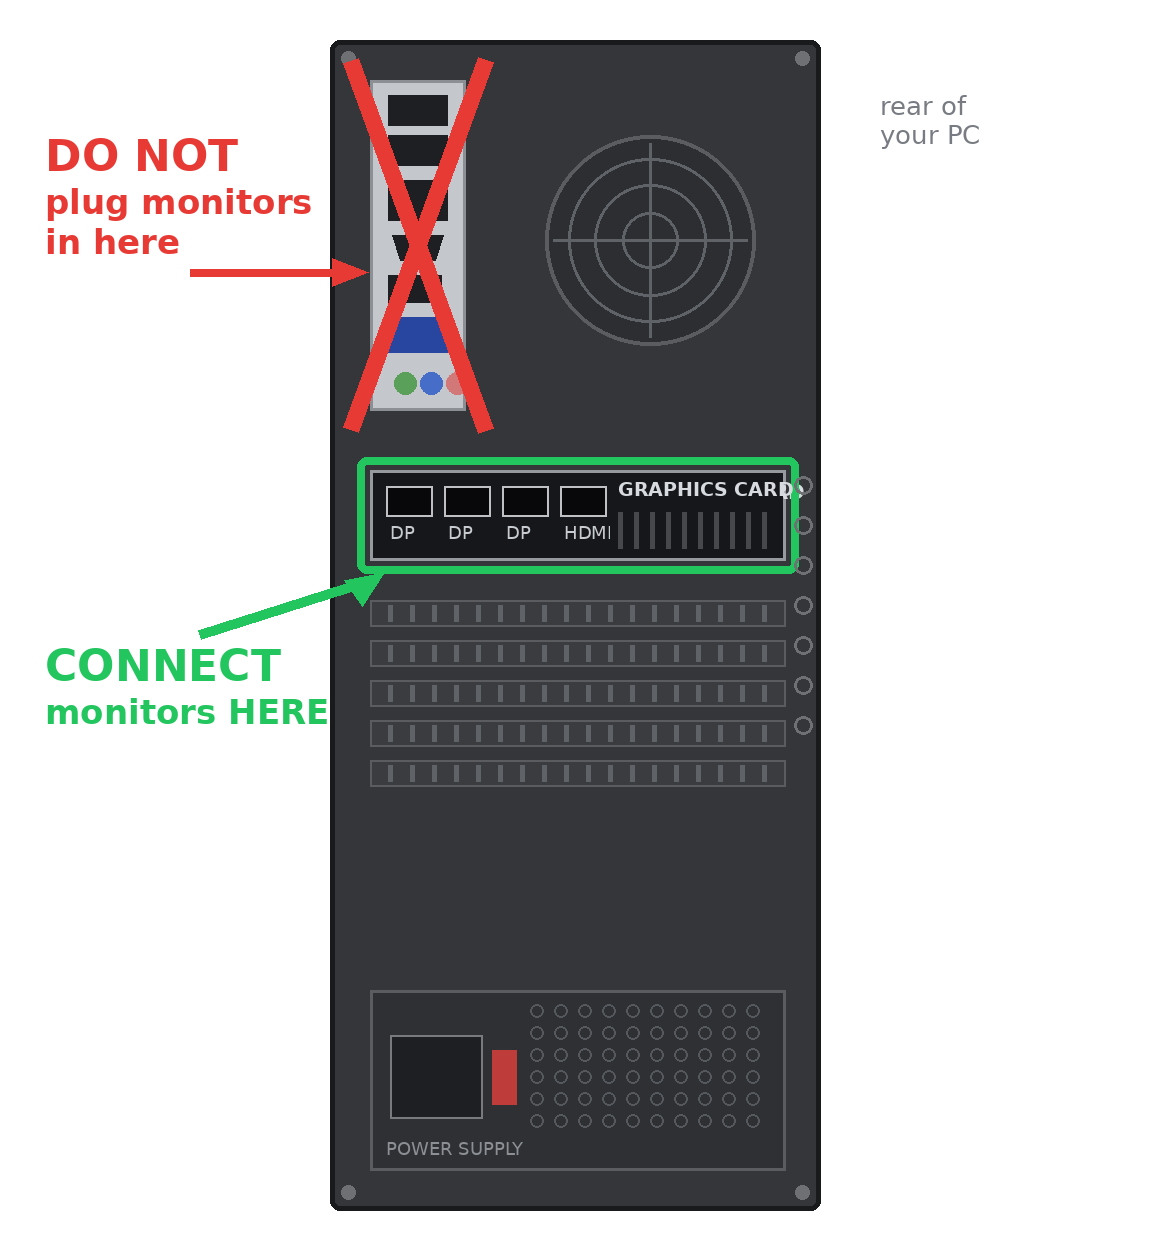
Look at the back of the case. The tall group of ports near the top belongs to the motherboard — on a computer with a dedicated graphics card these video outputs are usually inactive, so a monitor plugged in there shows a black screen or “no signal”. The graphics card sits lower down, running sideways across the case, with its DisplayPort and HDMI ports in a horizontal row. That’s where every monitor belongs — and yes, you can use several of the card’s ports at once for multiple monitors.

A 60-second checklist

1. Trace the monitor cable to the back of the PC — is it in the top (motherboard) ports? Move it down to the graphics card.
2. Check both ends of the cable are seated firmly, and that the monitor is set to the right input (HDMI 1, DisplayPort, etc.) using its own buttons.
3. Try a different port on the graphics card, or a different cable — cables fail more often than computers.
4. Restart the PC with the monitor connected, so the system detects it from the start.

Why this happens after moving house or cleaning

The monitor no signal surprise almost always follows a move, a clean-up behind the desk, or a helpful family member re-plugging cables. The motherboard ports sit higher and look inviting, so cables naturally end up there. One glance at the picture above and the fix takes ten seconds.

Tested before it ships

Every ArkPC desktop with a dedicated graphics card leaves our bench with the monitor outputs tested and clearly identified — and our machines arrive with Linux installed, configured and ready to work. Browse refurbished Linux desktops and new Linux workstations, or contact ArkPC support if your screen is still dark — we’re Australian-based and happy to help.
Posted on

Dual Boot Menu Not Showing – How to Get It Back

Dual boot menu not showing – guide to restoring the boot menu on a Linux PC

Dual boot menu not showing? Here’s how it works and how to get it back

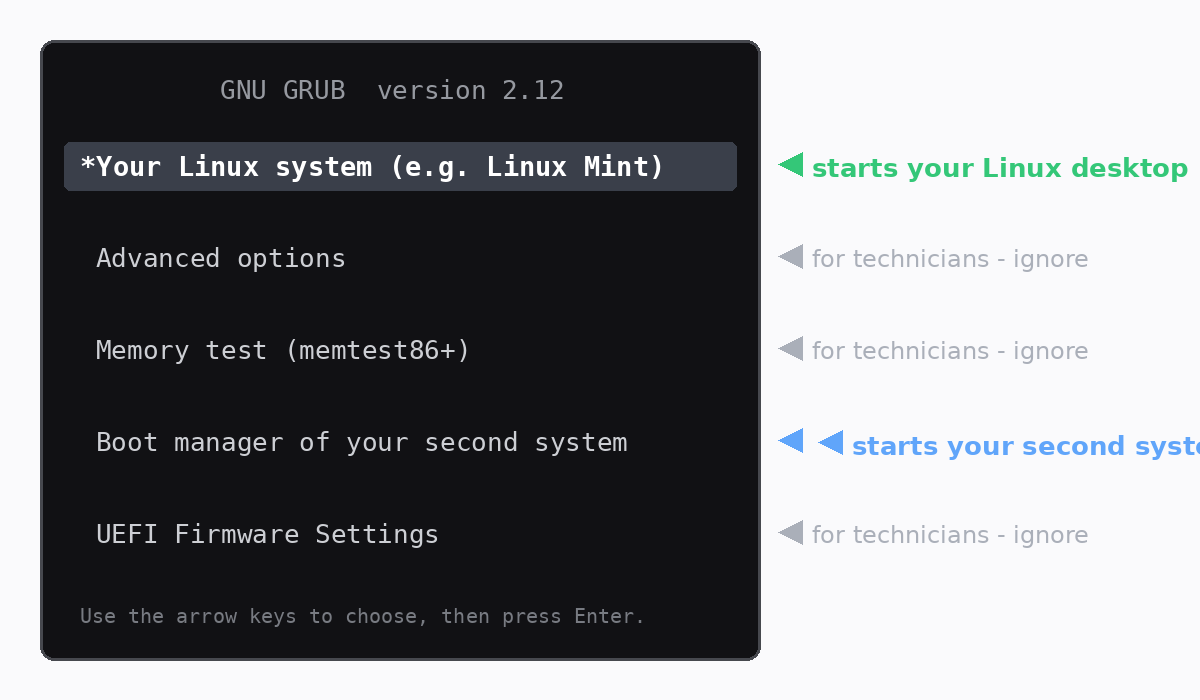
The dual boot menu is the black text screen that appears every time you switch on a computer with two operating systems, letting you choose which one to start. It looks plain, but that’s its strength — it lives outside both systems, so it is extremely reliable. This guide shows you how to read it, and how to bring the dual boot menu back if your computer suddenly starts skipping it.

Reading the menu

Use the ↑ and ↓ arrow keys to highlight an entry, then press Enter. The first entry is your Linux system and starts automatically after about 10 seconds if you don’t touch anything. The entry mentioning a boot manager starts your second operating system. Everything else — advanced options, memory test, firmware settings — is for technicians and can be safely ignored. Your choice only lasts for that session; next power-on, the dual boot menu asks again.

When the menu disappears

Very occasionally, a major update of your second operating system puts its own boot manager first in the computer’s firmware, so the machine boots straight into it and the dual boot menu never appears. Nothing has been deleted — your Linux system and all your files are still exactly where they were. The firmware is simply pointing at the wrong door.

Getting the dual boot menu back

Step 1. Restart the computer and immediately tap your machine’s boot-menu key — commonly F12, F9, F10 or Esc — about once per second until a list of boot devices appears.

Step 2. Choose the entry named “ubuntu” or the one carrying your Linux distro’s name. The dual boot menu returns immediately, and in most cases stays back for good.

Step 3. If it keeps happening, open the BIOS/UEFI settings (often the Del or F2 key at power-on) and move the Linux entry to the top of the boot order list. That makes the menu permanent again.

Dual boot without the guesswork

Every dual-boot computer we build ships with the boot menu configured, tested through restarts and updates, and a printed quick-guide in the box — because choosing your system should be the easiest part of your day. Browse our Linux desktops and laptops with the Dual Boot option at checkout, or ask ArkPC support if your menu is misbehaving — we answer real questions and often turn them into new guides.